Monday, December 27, 2010

Monday, December 20, 2010

A Peacock Family Christmas: "Maybe Next Year" Edition

Maybe next year. . .
I'll make these really cute Christmas lights. Kristen (my best friend who is getting married) shared this idea with me after seeing in here. I absolutely adore them! I've recently started appreciating felt and all the wonderful things that can be done using it. So seeing felt used yet again is super fun! There is a full tutorial in the link of how to make these sweet light garlands.

I'll make my own new tree skirt! After seeing a guest post on one of my favorite blogs, Smile and Wave, about how to make a tree skirt I have felt inspired to try my own! I don't have time to make one this year but I'd love to give it a whirl next year. This is the one that is made during the tutorial.


Design Sponge, which is a super excellent blog, also posted a tutorial on making tree skirts that is really great! Here is what their finished product looks like:


I'll make pretty teacup candles to give as gifts. Emily posted a how-to over at her Anderson Family Crew 
blog. I have seen this idea before and really wanted to try it last year but once again ran out of time. I am making a personal vow to myself to make this before next Christmas rolls around!


I will use fabric to wrap gifts! It can be done in so many cute ways. I especially like the way a guest poster over at Design Sponge demonstrated. They used fabric to create ribbons and bags for wrapping. 


and maybe next year I'll do another hundred other things on my list! 
xoK

Saturday, December 18, 2010

A Peacock Family Christmas: Decoration Edition II

I showed a few handmade Christmas decorations that appear around Peacock but there are many more to be seen. I've invested quite some time in creating a festive home and I think it has paid off! One of the things I thought of a while back and was so excited to do was use books as decorations. I envisioned all of my red and green bound books together to add a splash of holiday colors to a room. When I re-stacked all of my books I used to opportunity to grab all the reds and greens. I put them on one of our many space-heater turned shelves in front of a window and really like the overall appearance!
The book ends are also hand-me-downs of Nannie's that my sister, Meggie, so lovingly allowed me to have even though Nannie split them between us. I had no idea what to do with these until the books needed some ends so I tossed a few extra ornaments in them and voila! 

I obviously couldn't leave my children's books on the cluttered shelf unseen so they too moved to a space heater turned shelf! 

I also discovered (drumroll, please. . . ) Chalkboard Paint! And let me tell you, it was a life-changing discovery. I have begun painting all sorts of things with it including a few ornaments. 


I also painted a few picture frames as gifts and wrote on them then tied a piece of chalk in the ribbon. I thought it was clever or at least creative! I'll share the other results of chalkboard paint later.
xoK

Friday, December 17, 2010

Pumpkin Pie

This is the recipe I mentioned for my brother's favorite pie, Pumpkin Pie! I made it for the first time a few weeks ago as a gift for his 24th birthday. His birthday is during such a fun time of year because it's right before the holidays! And everyone loves the holidays because who doesn't enjoy a good excuse to cook a lot, eat a lot, and laugh a lot? Anyways, since I don't eat pumpkin pie I'm not sure if this recipe was any good but here is the one I followed. If you happen to try it out, let me know how it tastes! 

Pumpkin Pie

Ingredients

  • 1 (8-ounce) package cream cheese, softened
  • 2 cups canned pumpkin, mashed
  • 1 cup sugar
  • 1/4 teaspoon salt
  • 1 egg plus 2 egg yolks, slightly beaten
  • 1 cup half-and-half
  • 1/4 cup (1/2 stick) melted butter
  • 1 teaspoon vanilla extract
  • 1/2 teaspoon ground cinnamon
  • 1/4 teaspoon ground ginger, optional
  • 1 piece pre-made pie dough
  • Whipped cream, for topping


Directions

Preheat the oven to 350 degrees F.
Place 1 piece of pre-made pie dough down into a (9-inch) pie panand press down along the bottom and all sides. Pinch and crimp the edges together to make a pretty pattern. Put the pie shell back into the freezer for 1 hour to firm up. Fit a piece of aluminum foil to cover the inside of the shell completely. Fill the shell up to the edges with pie weights or dried beans (about 2 pounds) and place it in the oven. Bake for 10 minutes, remove the foil and pie weightsand bake for another 10 minutes or until the crust is dried out and beginning to color.
For the filling, in a large mixing bowl, beat the cream cheese with a hand mixer. Add the pumpkin and beat until combined. Add the sugar and salt, and beat until combined. Add the eggs mixed with the yolks, half-and-half, and melted butter, and beat until combined. Finally, add the vanilla, cinnamon, and ginger, if using, and beat until incorporated.
Pour the filling into the warm prepared pie crust and bake for 50 minutes, or until the center is set. Place the pie on a wire rack and cool to room temperature. Cut into slices and top each piece with a generous amount of whipped cream. Eat and Enjoy! 


Oh, and here are some pretty pictures of Pumpkin Pie or related things. . .

Pumpkin Pie
Pumpkin Pie Bites

Apple Butter Pumpkin Pie
xoK

Thursday, December 16, 2010

Pie in a Jar

If you really knew me you would know. . .
that I really enjoy baking. It's a way I show love; if I ever give you baked goods you can simple reply with, "I love you too." Ask my brother-in-law, Nick, who receives baked goods for nearly every birthday and Christmas. He tells me he likes it but really I think he may just be too nice to say otherwise. . . Regardless, being the katie-homemaker that I am, I was pretty impressed with this idea- Pie in a Jar! 
Etsy shop All Jarred Up sells pie that is literally shipped to you in a jar! 
"Pear-ed Together"

"I Go Bananas Over You"

"Grape to Meet You!"

"P is for Pecan"

 "How do you like them apples?"


Perhaps I will just make pies to sell so I can actually buy Nick a real gift rather than give him more pies. Or maybe I'll just share the recipe I use to make his favorite pie! 
xoK


Wednesday, December 15, 2010

You Are The Best Thing

I just really love this song. 
xoK

A Peacock Family Christmas: Decoration Edition

I had a much needed craft afternoon recently. And not as in, oh I need to make a gift for this person or finish that project. It was simply a day where I said, "self- what do you feel like making today? (although, whatever you start you absolutely MUST finish so don't say a quilt.)" The answer? Christmas decorations, of course! So after lunch with some sweet friends I head to the best place ever, the craft store. A hour and $50 later I am headed home to make a few things and finish a few others. (As a disclaimer for my sister who will eventually be reading this: I am still poor but part of this $50 was your children's Christmas present!) 
Here are a few results of the day:


The wreath was super easy to make. I just bought a styrofoam wreath at the craft store and some yarn. I hot glued the beginning of the yarn to the inside of the wreath then wrapped the yarn around the wreath. After the entire wreath was covered I hot glued the end of the yarn to the inside of the wreath again. 

I used some lace ribbon I had to make a bow and used extra yarn to make a wreath hanger. I especially like that I didn't use any red because that wreath could just be a permanent fixture to my door. I think it's super cute! 


I also bought some styrofoam cones to make little Christmas trees. I just used hot glue to wrap fabric around the foam then decorated the fabric trees. The one of the left is a mixture of ribbons, yarn, and lace. The middle one is lace fringe that sorta bubbles out. And the one on the right is covered in white lace then has yarn over it. The craft store also had those candles on sale of $.69! They are super great and smell good too! I dressed them up a little with ribbon and yarn. The lace fringe was my favorite so there are three of those around the house! 

Have you made anything crafty lately?
xoK

Tuesday, December 14, 2010

over the river and through the woods to Nannie's house we go!

Last weekend my sister, two nephews, and I packed up camp and drove two hours to visit our grandmother whom we lovingly refer to as Nannie. Nannie has an old southern accent and repeatedly says the phrase, "now it's like i've always said" in reference to things she has never said before. It's endearing. So we spent the night, enjoyed a few meals together, helped put up then decorate her Christmas tree, then stumbled upon some really great hidden treasures in her garage. Apparently Nannie was planning on giving away some incredibly wonderful items that my sister saw and knew I'd love! It actually all started a hanging coat/hat rack that I, of course, repurposed.

And it hangs above my bookshelf made of books. . .

Which I finally got around to re-stacking to look nicer.

Prior to this they were stacked more by size than color and eventually began to look cluttered. It didn't help that my sweet puppy Millie would chew on the corners of the books and shred any loose books she could get. It was especially terrible after I began stacking newly acquired books in front of the original stack rather than on top. Needless to say, I am thrilled with my restacking because a) the chewed corners are no longer visible, b) they are somewhat color coordinated, which I really like! and c) there is one slightly taller stack rather than two messy stacks! 

Plenty more came from Nannie's garage that I adore. Luckily my sister, Meggie, is more of a "Pottery Barn meets Snapdragon" kind of decorator so I didn't have to fight her for the lovely items discovered at my Grandmother's. =)

xoK


Monday, December 13, 2010

Craft Crush: Pilli Pilli

I stumbled upon the photo stream of Pilli Pilli Handmade. I know nothing about this person except that I adore everyone single one of this precious little creations. I am a bit over obsessed with garlandy bunting things at the moment. I would have them everywhere if I could but I'm not sure my roommates would permit such decor. I also have been toying with the idea of hanging fabric in embroidery hoops as decor. So the combination of bunting and embroidery hoops simply mades me giddy with joy. You can also check out what Pilli Pilli is up to on her blog if you're interested! 
personalized!
Color is so wonderful. 

set sail, my little love boat!
burlap + lace + red&lightblue + hearts + sail boats = lovelovelove. 
books are full of surprises...
This is so neat! A book turned window box. I absolutely adore this idea! 

a winter wonderland...
The only thing better than the combination of bunting and embroidery hoops is the two PLUS Christmas!

snowy cloud hoop

Oh Happy Day!!
"Oh happy day!" is exactly what each of these makes me think.

wall art - where love grows
"Let love grow."

xoK

Sunday, December 12, 2010

A Peacock Family Christmas: Garland Edition

D.I.Y. Dot Garland
I'm not sure where I originally saw this idea because apparently it's everywhere. Nonetheless, I jumped on the bandwagon of the ever adorable dot garland. Here is the basic idea. . .
The dots can be the same size in various colors with space between them. . .

or with lots of pretty colors and closer together. . .

or just alternate colors overlapping each other. . .

or multicolored but stitched from the top rather than the middle. . .

or in all sizes and colors but all in line! 


There is obviously 100 ways to ice a cake ("skin a cat" just sounds so terrible. . .) So I decided to stick with the basics for my first go 'round. 
I bought pre-cut 8.5 x 11 sheets of stiff felt in the basic Christmas colors. Sadly, I didn't take nearly enough pictures along the way but all I did was trace the lid of a mason jar to create same size circles.

I quickly realized this left me with random extra felt so I traced a candle to make mini-circles. This took me quite some time so I put on a movie while I cut. The cutting was the only time consuming part. 
This is where I stopped taking pictures and just focused on cutting. But once all the circles were cut I had a decision to make! Do I do garlands with mixed sizes or same size only? Do I leave space between the dots or put them right beside each other? Do I let the dots overlap? Do I put the small dots on top of the big dots? Ahhh! I eventually decided on same size dots with no space between the dots but not overlapping. From there, the process was quick and easy! All I did was begin with one dot and start sewing down the center so I was left with a circle with a line straight across. Then I would put a different color dot right next to it and keep on going. I didn't worry too much about keeping the stitch centered on the dots because you can't really notice in the end. 
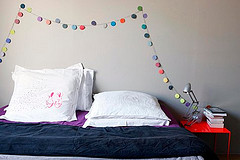
I really liked the finished product! I ended up with two "big dot garlands" and one "mini-dot garland" although I am not using the mini-dot garland as garland any longer. It's already been repurposed in a way I will share with you later. =) 

xoK

Friday, December 10, 2010

"Wanna see the lights in my bed?"

Yes, this is the awkward phrase I uttered to my friend, Matt, as soon as he walked in the door. Forget the traditional, "hello!" or "welcome to peacock" or "hey, how are ya?" No, I go straight for the kill and invite the poor guy into my bed. I quickly followed up with "room" but not before he could look at me like I was crazy and all of my friends could laugh hysterically at my awkwardness. What was Matt's response? "Does that usually work for you? If so, I should start using that as a pick-up line." 
Allow me to explain-I had been inspired by photographs such as these. . .

-bed

my room for christmas!

spring time

Tree in Bed


It actually was not all of these pictures that led me to put lights in my room. From where did my inspiration come? Cleaning. Yes, cleaning. Well, organizing to be more exact. I had one extra box of Christmas lights that had to be used. Couldn't I just save them for next year, you might ask? Absolutely not, that is entirely too logical. Every single light bulb must be put to use! The result? A truly magical bed that I'm not sure how I ever survived in prior to this moment. 
I like it better than all of the others combined. It's the most magical bedroom in the whole wide world. 

xoK